
How to Protect Outdoor Christmas Light Plugs From Rain
A step-by-step guide to keep outdoor Christmas lights and extension cord connections safe, dry, and running.
How to keep outdoor Christmas light plugs dry
If you are asking whether Christmas light plugs can get wet, the safest approach is to seal each exposed connection point. Rain Block® gaskets work as a waterproof extension cord connector solution for outdoor plug connections, decorations, and string lights.
For full setup, use the steps below and add a weatherproof extension cord cover kit before storms or snowfall.
A Brief History of Christmas Lights
Christmas lights began as candles on trees in 18th-century Germany. Electric lights arrived in the 1880s and outdoor displays came later.
18th Century - Germany
Christmas trees were adopted in homes in 18th-century Germany, where they were occasionally decorated with candles. Because candles were relatively expensive, Christmas trees were primarily found in upper-class homes.
1880s - The Birth of Electric Christmas Lights
Early electric Christmas lights were introduced in the 1880s with the arrival of electricity.
1882 - Edward Johnson's Electric Christmas Tree
The first known Christmas tree lit by electric light was created by Edward Johnson, an associate of Thomas Edison and vice president of the Edison Electric Light Company.
Johnson's tree was wired with 80 red, white, and blue, walnut-sized incandescent bulbs and displayed on December 22, 1882.
After being featured in a Detroit newspaper, Johnson became known as the Father of Electric Christmas Tree Lights. Because electric lights were still expensive, they did not appear in most households until 1930.
1904-1912 - Christmas Lights Go Outdoors
Christmas lights were used exclusively indoors until:
- 1904 in San Diego
- 1909 in Appleton, Wisconsin
- 1912 in New York City
These mark the first recorded instances of Christmas lights being displayed outdoors.
1956 - Outdoor Displays Become Tradition
McAdenville, North Carolina claims to have been the first town to create a large-scale outdoor Christmas light display in 1956.
Once lights moved outdoors, rain became a problem and it still is today.
WARNING
Safety first
- •Begin by making sure the extension cord or lights are NOT PLUGGED into the outlet.
- •Never work with live wires. Always unplug from the outlet before touching changes.
- •Use Rain Block® gaskets/kits only with a properly tested, functioning GFCI outlet.
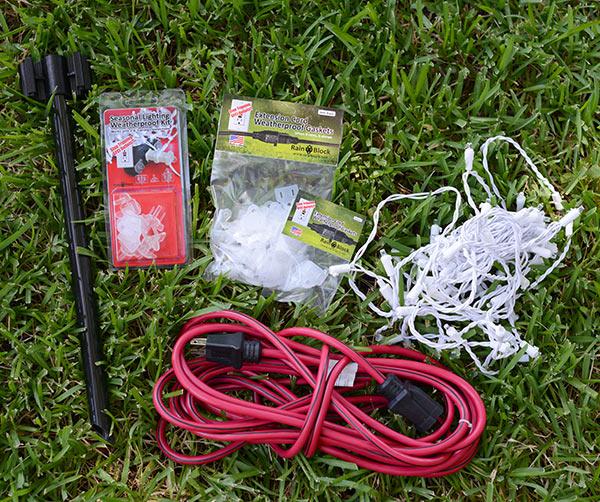
(Fig. 1) Items needed to weatherproof Christmas lights.
Items Needed
- At least one pack of Rain Block® Weatherproof Gaskets
- At least one pack of Seasonal Lighting Weatherproof Kit
- A contractor-rated extension cord (preferably rated for 15 Amps or above)
- Outdoor-rated lights
- Stake to hold extension cord in an inverted position
Recommended: Choose cords with no openings in the connector body.

(fig. 2) The type extension cord pictured will NOT work.
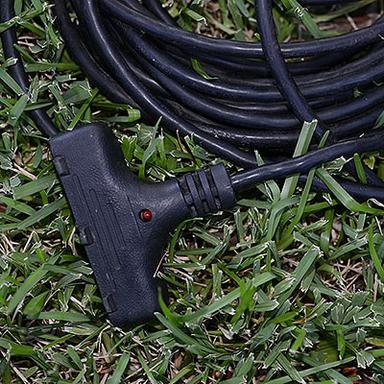
(fig. 3) Multi-plug cord.
Selecting the Right Extension Cord
Start by selecting the right extension cord for the job. It's best to use contractor rated extension cords such as the one pictured in fig 1. The style pictured in fig 2 will NOT work. There are too many openings that will allow water in. Thanks to the Rain Block® Seasonal Weatherproof Kit, you can also weatherproof multi-plug cords, similar to the one shown in fig 3. The cord in the photo has an LED that we sealed with regular clear silicone. If your cord has any openings like that it is best to seal it with silicone. It's best to choose cords with no openings.
(fig. 4) Multi-prong cord.
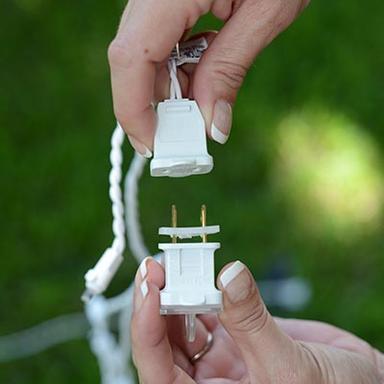
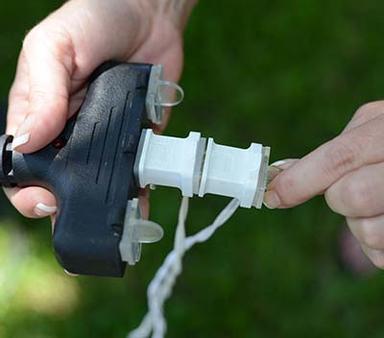
Apply the Gasket
Once we have verified that everything is unplugged, we begin at the extension cord. Place a Rain Block® Weatherproof Gasket on the male connector of the light or decoration and firmly press the two together. The gasket will compress slightly and lock out water.
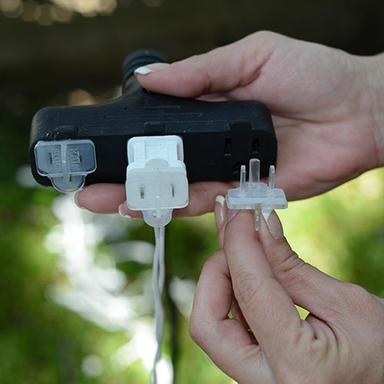
(fig. 5) Seal all open female connections.
Seal Open Connections
If it is a multi-outlet cord, like the one shown, make sure all open female connections are closed by placing a gasket on a Rain Block® Termination Plug and firmly pressing it into the open connections. Also seal off the back of the light plug's female connection the same way, unless you plan to plug another string of lights into the open connection.
(fig. 6) Connecting multiple light strands.
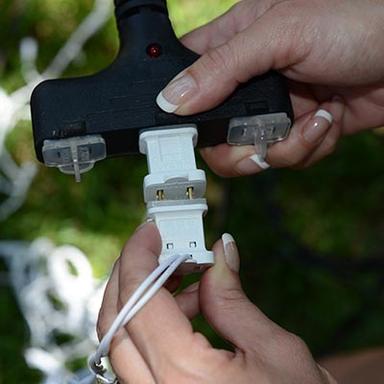
Connect Multiple Strings
You can plug a second string of Christmas lights into the first by applying a gasket to the male plug and firmly press the two together. From there you can daisy chain multiple Christmas light strands together by applying a gasket to the male connection and firmly pressing it into the end female connector. Don't forget to close off the back with an end plug and gasket.
(fig. 7) Close off the end connection.
Seal the End
Seal off the end of the last light strand by snapping off the third prong of the termination plug, along the score line. Place a gasket on the plug and firmly press it into the female connection.
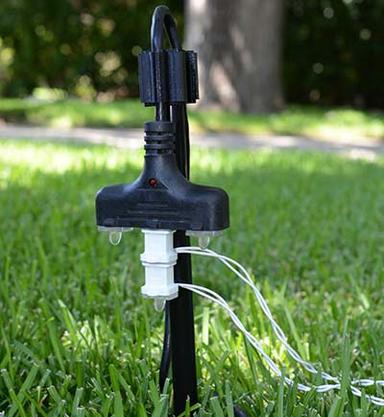
(fig. 8) Hang the extension cord upside down.
Position the Cord
It is best if the cord is then placed on a stake above ground and in an upside down position, as shown in fig 8. This position helps keep water dripping off the cord, keeping it from entering the open third ground hole on the cord.
That's all there is to it. Weatherproofing Christmas lights is now simple and reliable.